“Faux Chipboard” Mini Accordian Album {With Tutorial} Warning Dial Up Users… Gobs of Photos!
Hey friends! I woke up sick as a dog this morning and just feel like lying around sleeping all day, but I wanted to share this fun project with you. I survived my birthday on Sunday… woo hooo .. 34 years young! The cute pink mat you see under the project was one of my bday presents from my sweetheart! (I’ll share the other later in the week when I get the pics off my camera.)
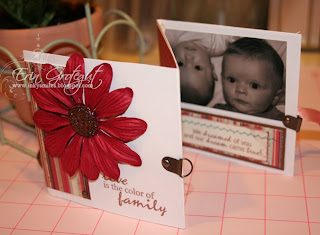
I am a guest designer over at Sweet n Sassy Stamps this month and this is “Faux Chipboard” Mini Accordian album is one of my projects! It was super fun to do and super, super easy!
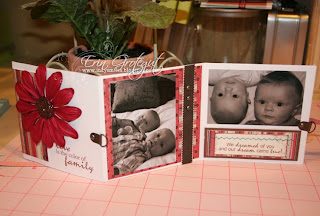
This Sweet n’ Sassy Adoption set does not limit itself to just adoption! It’s perfect to use for FAMILY projects as well. This project is a mini “faux chipboard” album that I made to show off my sister’s twins, Sidney & Isaac. My sister had a difficult time achieving and keeping a pregnancy, so when these two came along, it was a dream come true times two! If you’re hankering for a chipboard feel album but don’t have any chipboard on hand, here’s an easy way to get the feel and weight of chipboard with regular cardstock!
 For this project you will need: (I tried to make this simple… use what you have and order the stamps!)
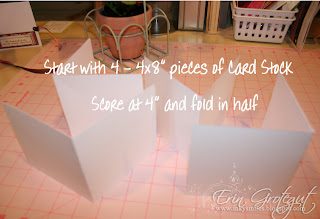
*4 strips of 4×8 cardstock
*Misc coordinating patterned paper or cardstock (I used My Mind’s Eye “Adore”)
*Miscellaneous brads, photohangers, & embellishments (I used CTMH metals, *Doodlebug Designs Glitter)
*12″ of coordinating ribbon
*Bazzill Basics Paper Flower
*Bonefolder, Paper Piercer, Craft Knife, Trimmer, Adhesive
*Two or more photos in B&W or Sepia
For the glittery center of the flower, I used a plain old button and covered it with Liquid Glass (CTMH) and then generously sprinkled Doodlebug Glitter all over the button and set it out to dry so that it would be ready to stick on when I was finished with the album. You may want to do the glitter part outside away from your “nice space” because you may end up COVERED in glitter 🙂
I left a blank piece of patterned cardstock on the back of the book for a little private journaling.
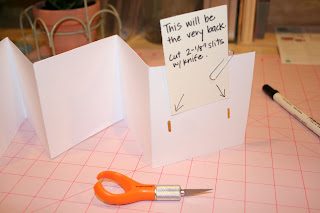
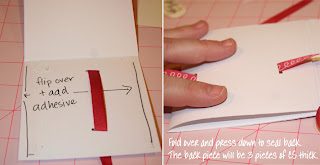
I’ve printed the instructions on the photos for easy following. If you have any questions, please email me at inkysmiles@gmail.com and I will be glad to help you with this project.
Now, read the tutorial and then get off the computer and start CREATING 🙂





10 thoughts on ““Faux Chipboard” Mini Accordian Album {With Tutorial} Warning Dial Up Users… Gobs of Photos!”
I love it! Your instructions are so easy to follow. I am going to try to make one of these soon. Thanks so much for sharing!
Hey Erin!Happy BELATED birthday to you! Hope you had lots of fun!!!This is a great tutorial and I really appreciate your sharing it!Hugs
What a wonderful Tutorial! Hope you feel better!Happy Birthday wishes!!!
Happy B Birthday, too Erin!Sorry wasn’t around to help you nap…er celebrate!Love the Mini album!
I really really really love this faux chipboard mini album.It is really cute.
Sorry for the second post but I forgot to leave my name on the post above.I really really really love this faux chipboard mini album.It is really cute. Joan Fiskateer # 808
Ooh glad to see it all in one spot!LOL!!Fantastic!! I’m going to try and make one this weekend. See you Tuesday!!
HAPPY (belated) BIRTHDAY!!You are awesome!!
Super accordian book … love the papers you have used.May I have permission o add your link to my blog?
I finally have the perfect project to use with this – thanks so much for sharing your wonderful creativity! I love reading your blog.Lisa P